Showing posts with label rolled roses. Show all posts

Monday, 6 April 2015

DIY Framed Cork Moodboard

Welcome to today's tutorial.  Sorry for the lateness on this one, but with Easter going on and a two year old who is just coming to understand the wonders of chocolate, well it's been a busy weekend to say the least!  Hopefully your holiday has been peaceful and fun-filled in equal measure!  Given that we're all now recovering from chocolate comas, I thought I'd keep today's tutorial quick and easy.  Today we're making moodboards using just a frame and some cork roll, easily found at any big craft shop!  It features my rolled roses, click here to visit that post (opens in another window, so you won't lose this one!) to learn how to make simple rolled roses from fabric scraps and ribbon.

DIY corkboard moodboard tutorial cork pin roses lace shabby chic craft frame cottage

DIY corkboard moodboard tutorial cork pin roses lace shabby chic craft frame cottage
For this tutorial, you will need the following:

  • A roll of craft cork
  • a picture frame (mine is for and 8X10 and was from a discount shop, but any frame will do)
  • lace or ribbon (enough for two 20cm lengths)
  • velvet ribbon 1.5cm (I made 6 strips of 10cm each in pink and blue.  Make as many as you would like for the amount of thumb tacks you wish to use).
  • thumb tacks (brass tacks with a nice large flat face for good adherence to your roses are best)
  • double sided tape
  • scissors
  • craft glue and skewer
  • marker
  • extra strong glue (E6000 or similar)


Start by unrolling your cork, and lay it down as flat as possible.  Dismantle your frame and use the glass as a template for cutting your cork.  Use the marker to draw around the glass then cut the cork with scissors.  Depending on the thickness of your cork and the length of the points on your tacks you will probably need a few layers.  I stuck with 3 layers, which still left the tacks slightly proud of the cork, but any more than that and I wouldn't have been able to close the frame again.
To keep your cork layers together, put a strip of double sided tape along the top and bottom, and a strip down the middle of two of the layers and sandwich them all together, making sure to keep the edges as even as possible.  By putting the tape down the middle, you prevent the top layer of cork from bowing out of the frame.
Cut your lace or ribbon to two 20cm lengths and position them diagonally across two of the corners of your cork.  Pin them in place and turn the whole thing over.  Use double sided tape to secure the ends of the lace or ribbon to the back of the cork.  Remove the pins.

DIY corkboard moodboard tutorial cork pin roses lace shabby chic craft frame cottage

DIY corkboard moodboard tutorial cork pin roses lace shabby chic craft frame cottage

Now it's time to reassemble the frame.  Set the glass aside, as you won't need it (I do these sort of things a lot, stay tuned for a tutorial for what to do with that glass!).  Sit your cork in your frame and replace the back, being careful if the cork is a bit thick for your frame.  It may need some gentle persuasion.

DIY corkboard moodboard tutorial cork pin roses lace shabby chic craft frame cottage


Follow my Rolled Rose tutorial for turning the strips of velvet ribbon into pretty little roses.  Glue the roses onto your tacks with strong glue (not just craft glue, as it won't bond properly to the metal of the tacks).  Let them dry thoroughly before using.

DIY corkboard moodboard tutorial cork pin roses lace shabby chic craft frame cottage rolled rose fabric rose

Here's the result so far:

DIY corkboard moodboard tutorial cork pin roses lace shabby chic craft frame cottage

Now, at this point its perfect for a few different uses; to organise the mail or notes as part of your household command centre or office, or as somewhere to keep reminders, invitations or keepsakes.  I used mine to create a little shabby moodboard.

DIY corkboard moodboard tutorial cork pin roses lace shabby chic craft frame cottage
Ribbon, felt flowers, eyelet lace, a vintage-look label, some silk flowers, paint chips and a cute little souvenir Mum picked up in Singapore or Malaysia.  It's a great way to draw a few different things together, get them out of the drawers and up where they can be seen and give inspiration for decor or a craft project.  An option would be to replace the lace in the bottom corner with a strip of pretty fabric to make a pocket for larger items or envelopes.

So there you are, a nice easy one for the Easter recovery!  Let me know what you used your board for by leaving a pic in the comments, or on my Facebook page.

Take care,
Emma

Friday, 20 March 2015

Shabby Rosie Posey

Welcome to this week's tutorial: making your own gorgeous little shabby chic poseys!  This tutorial will also feature a couple of alternative uses for your posies and flowers.  Let's get making!

shabby chi rose flower lace velvet button pearl bead

For this tutorial you will need the following:
  • Velvet ribbon 1.5cm wide cut to 10cm lengths (5/8ths" by 4")
  • Lace. Mine is 3.5cm cut to 12cm lengths (1 3/8ths " by 4 3/4")
  • Florists wire.  The wire used here comes in 46cm lengths (about 18"), some are left full length for beading and stringing buttons, others are cut in half for the velvet and lace roses.
  • Needle and Thread (use a colour that blends in with the lace)
  • Scissors
  • Ruler
  • Ribbon for tying posey
  • Florists or washi tape
  • Pliers (preferably a pair each of needle nose and round nose, as well as nippers for cutting the wire.  If you only have a pair of normal household pliers, that's ok.  See the notes in the tutorial about how to use these.)
  • Beads.  These could be glass or plastic.  Use a mix of pearls, rounds and spears.
  • Buttons.  Make pairs of buttons, one larger than the other.
  • Craft glue, bamboo skewer and cardboard to protect your work surface.

velvet ribbon florist wire craft glue scissors pliers ribbon beads wire

Method

Start by forming your velvet ribbon roses.  For full instructions, check out my Rolled Rose Tutorial post.

rolled rose velvet ribbon fabric craft diy flower

Make 3 each of light pink and dark pink.

Next, make the lace flowers.  Thread a needle with sewing cotton in a colour to match your lace (mine is slightly contrasting so you can see it) and form a large waste knot at the end.  Roll up the first 2 centimetres (1") and put a stitch through the bottom of it to hold it in place.  Make large basting stitches along the bottom of your lace, then pull and coil the lace to form a ruffled rose shape.  Put a few stitches through the bottom of it, making sure to sew through all the layers.

lace rose flower wire pliers sewing

Using a pair of flat pliers (or household pliers wrapped with masking tape to soften the ridges), wrap the end of one of your half-lengths of wire around the base of the lace rose.  Make sure to enclose all the layers, and squeeze to tighten.  Make 6 lace roses.

To add stems to your velvet roses, start by making a coil at the end of one of the half-lengths of wire.  Use round nose pliers to get started (or use household pliers and bed the end of the wire around the bamboo skewer), then use needle nose pliers, to pinch the coil and bend it along the length of the wire.  When the coil is about 1cm in diameter, bend it at 90 degrees to the rest of the wire length.

wire wrapping pliers coil flower rose velvet ribbon

Use craft (or hot glue if you prefer), to bond the velvet roses to the wire coil.

To wire the buttons, use full length wires folded loosely in half.  Thread the two ends into the buttonholes (diagonally opposite if using buttons with 4 holes) of a small button and a larger button.  Hold the wire with pliers and turn the buttons with your fingers to twist the wires together and secure the button so it doesn't move.  Continue to twist the length of the wire together.  Make 3 - 4 button wires.

buttons wire pliers wire wrapping

Use a similar method for the beaded wires.  Fold a full length wire loosely in half to find the middle.  Thread the bead, pearl or crystal on one end until it's in the middle, then twist the wires by holding them near the bead with pliers and using your fingers to turn the bead.  Be careful to wind onlly tight enough to stop the bead from moving, without over winding as they can be fragile.  Make 2-3 beaded wires for each kind of bead you're using.

olive green plastic glass crystal spear briolette wire

Put together your posey by holding the stems in your hand, adding different types of roses, button wires and beaded wires, until it's all together.  Use the florist or washi tape to hold the posey together, and then use a ribbon to tie a bow.  Trim the stems as necessary with pliers.

roses flowers buttons beads crystals wire washi tape

lace buttons beads crystals wire velvet

vevelvet ribbon buttons lace beads pearls crystals

lace velvet roses flowers bouquet posey washi tape

Posey's like this make great decor and gifts, but there are many other applications for these forever flowers.
Boutonniere corsage wedding favour ribbon flowers key vintage

This boutonniere was made with a lace rose, a velvet rose, a button and a plastic rose which was attached to a wire using the same method as the velvet rose.  The stems were then wrapped in white ribbon and the vintage style key tied on with ivory ribbon.

embroidery hoop tag shabby flowers roses lace ribbon button

This wreath was made with an embroidery hoop.  Wide white ribbon was wrapped around where the flowers were going.  A posey of lace, velvet and plastic roses with bead and button wires was attached in place with pink lace and pins.  The shipping tag was stamped and the lace was attached with double sided tape before the button and rose were added with glue.  Finally, a ribbon was attached to the top of the tag and the tag attached to the hoop with double sided tape.

hair slide accessory fashion roses ribbon button velvet

Three lengths of wire were used to anchor the plastic and velvet ribbon roses.  The ends were coiled  and then the wires were glued to the middle of the slide.  The glue was hidden with ribbon and buttons glued on, then the flowers attached.

Thought of more uses for these pretty little poseys?  Let me know in the comments, and share your pics on instagram! (tag me in @liliflorapretty so I can share it)

Keep watching over the next few weeks for some exciting developments for both Liliflora Pretty and a revisit to a previous project I may have just found a happy home for!

Take care,
Emma


Friday, 20 February 2015

Rolled Rose Stud Earring Tutorial

Today's post is a tutorial just perfect for busting your fabric scrap stash and creating something cute and wearable at the same time.  These rag-roll rose earrings are easy to make and wear, and would make fantastic little gifts, stocking fillers or items for a swap party.  There are even a few suggestions for other things you can make with your roses, because you won't want to stop at just two!

shabby chic rolled rose rag-rolled rose stud earrings

Here's what you'll need:
rag roll roses roll roses shabby chic stud earrings
  • 2 Strips of fabric 40cm x 1.5cm (I've used cotton from my Coy Blooms collection, of course!)
  • Craft glue and bamboo skewer (or hot glue gun if you prefer).
  • E6000 glue or similar
  • 2 surgical steel stud earring posts with a 10mm pad and 2 butterfly backs.
 Start by putting a small amount of glue at one end of the back side of one of the fabric strips.  Fold the fabric over, making sure it's wonky as shown. Wonky is a technical term.

rag rolled rose stud earring tutorial step 1

 Next, fold the long end of the fabric up, so the edges run side by side.

rag rolled rose stud earring tutorial step 2

Apply glue in a line from the folded up fabric to the end

rag rolled rose stud earring tutorial step 3

Twist and roll in the end to where the glue was applied to form the centre of your rose.

rag rolled rose stud earring tutorial step 4

Keep applying small dabs of glue to the roll, then twist and coil the fabric around.  Hold it in place where you've glued for a few seconds to make sure it's holding before applying more glue further around the roll.

rag rolled rose stud earring tutorial step 5
Keep glueing, twisting and coiling until you reach the end.  Firmly glue down the end of the fabric, either flat to the side of the coil, or underneath it (this would be the 'back' of the rose).

rag rolled rose stud earring tutorial step 6

Repeat the steps to create a second rose.  Try to maintain the same tension in your twists and coils to get a fairly even result.  They don't have to be perfect, near enough is good enough for these shabby chic style roses.

rag rolled rose stud earring tutorial step 7

If you didn't already denote the 'back' of the roses by glueing the end of the fabric there, compare both sides of the rose to see which one you'd prefer to have showing to the world, and lay them face-down.  Apply a small dab of E6000 glue to the pads of your earring findings and hold them firmly against the centre of the backs of the roses.  You'll want to leave these for a couple of hours to be sure they take hold.

rag rolled rose stud earring tutorial step 8

Here are a couple of variations to show the versatility of these roses.  Below are a couple of earring sets made using velvet ribbon.  Because it's thicker than the cotton, I only used 20cm lengths for the larger roses, and 10cm lengths for the smaller ones.  I also applied a cotton rose and some velvet roses to a hair clip with a scrap of lovely vintage-look lace.

rag rolled rose stud earring tutorial velvet ribbon rose hairclip

And here are the rolled roses as pendants.  I used a large needle for bear and doll making to pierce a big enough hole for the jumprings.  They would also make cute charms on a bracelet or anklet, or even using ear wires to make dangling earrings instead of studs.

rag rolled rose stud earring tutorial necklace pendants

And that's all there is to it!  A simple, addictive craft that can bust your stash, fill a crafternoon and give you a pile of pretty, handy gifts to give to the shabby chic lover in your life, especially if that's you!

Rag Roll rose stud earring tutorial shabby chic cottage chic romantic

Don't forget to comment, Pin and share if you enjoyed this tutorial!

Hi to everyone who came here through the following link parties:
Project Pin-it at Glitter Glue and Paint
Shabbilicious Friday Link Party
Rose Garden Malevik Saturday Show Off
Dear Creatives Inspiration Spotlight link-up Party
ByStephanieLynns' Sunday Showcase
Skip to my Lou: Made by You Mondays
DIY Showoff's That DIY Party
I should be mopping the floors' Inspiration Monday
Grace Langdon Art's Making Monday
Just a Girl and Her Blog Hit me with your Best Shot
Upcycled Treasures The Makers Link Party
Kenary's Think and Make Thursday

Take care, Emma

P.S As much fun as this tutorial is, if you want to skip it and still have the earrings, they're available in my Etsy shop!

Friday, 13 February 2015

Liliflora Pretty's Etsy shop now open!

Liliflora Pretty is now on Etsy!  Products made with Liliflora Pretty fabrics, available on my Spoonflower shop, are now being listed in my Etsy shop!  New listings are being put up everyday, and here are a few that are already on there:

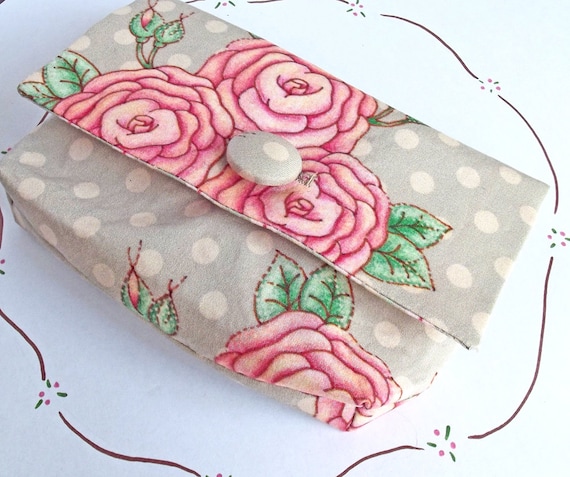
Small Clutch Purse

Big enough for the essentials of an evening out, but small enough to hold in one hand.

small clutch purse Etsy pink roses grey polkdot

Large Clutch Purse

Features a small inner pocket for extra organisation.

shabby chic pink roses grey polkadots

Double-Sided Peter Pan Collar

Roses on one side and sweet pastel pinstripes on the other

shabby chic detacheable collar peter pan velvet ribbon reversible

Bib Necklace

Features pink velvet ribbon tie-ups making the length easily adjustable.

shabby chic fabric bib necklace

Crossbody Pouch Purse

A long strap allows this little purse to be worn across the body, giving security to your valuables and leaving your hands free!

market purse shabby chic long strap purse

Coming up over the next few days will be a few more wearable items, earrings and buttons!  Favourite the Etsy shop to keep up to date with new products.  Next week's post will be a tutorial on making these gorgeous rolled rose stud earrings, which will be listed for sale over the coming days.

shabby chic Rag Rolled Rose Stud Earring Tutorial

Just before I go today, I'd like to say thank you to everyone who voted and favourited my entry to the Spoonflower/ Urban Threads Steampunk Valentines contest.  Unfortunately, I didn't make the cut to be in the top 10, but there's always next time!

Take care,
Emma.